

Table of Contents
- Where to Buy Custom Tesla Exterior Mods Online
- Quick Comparison: Tesla Exterior Mods and Pricing
- Best Tesla Model Y Exterior Mods for 2026
- Tesla Paint Protection Film Benefits for Cybertruck and Model Y
- Tesla Exterior Accessory Installation Guide: What You Can DIY
- Warranty, Range, and Fitment: What Tesla Owners Should Know
- Conclusion: Choosing the Right Tesla Exterior Mods
- Frequently Asked Questions
Last Updated: October 4, 2026
Where to Buy Custom Tesla Exterior Mods Online
Buying custom Tesla exterior mods online comes down to one thing: fitment you can trust before the box arrives. At Lee Mods, we built our Tesla catalog around direct-fit parts for specific model years, so you are not gambling on a "universal" bracket that needs grinding. This guide covers where to buy, what each mod costs, which ones you can install in your own garage, and the warranty and range questions most owners forget to ask.
Quick Comparison: Tesla Exterior Mods and Pricing
Here is the full lineup we recommend, with pricing and best use case for each.
| Product | Price | Material | Best For |
|---|---|---|---|
| ABS Side Skirt Extension Body Kit (Model Y Juniper 2025) | $255.99 | ABS plastic, UV-resistant | Stance and aero |
| Precut Window Privacy Tint Film (Model Y Juniper 2025-2026) | $183.99 | 2-ply PET film | Heat and UV blocking |
| Aluminum Roof Rack Crossbar Set (Model Y) | $269.99 | Aluminum | Cargo carrying |
| Precut Color Change PPF (Cybertruck 2024-2026) | $659.99 | PET film | Color change plus protection |
For a daily driver, the side skirt kit and tint film deliver the biggest visual and comfort return for the money. If you are hauling gear, the roof rack crossbars earn their place fast.

Best Tesla Model Y Exterior Mods for 2026
The strongest Model Y exterior upgrades for 2026 combine a sharper stance with real function, covering aesthetics, cabin comfort, and cargo capacity.

ABS Side Skirt Extension Body Kit for Model Y Juniper
The ABS Side Skirt Extension Body Kit for Tesla Model Y Juniper (2025) is our top pick for a sharper stance and a measurable aerodynamic gain. At $255.99, it transforms the car's profile without cutting or modifying the factory body.
- Full side skirt extensions for both sides
- ABS plastic construction, lightweight and UV-resistant
- Gloss black fast aero finish that resists yellowing and cracking
What most guides miss is the prep work: clean every mounting surface with IPA before you commit adhesive, and test-fit all panels first. The kit ships with mounting hardware and a panel-by-panel guide.
Precut Window Privacy Tint Film for Model Y Juniper
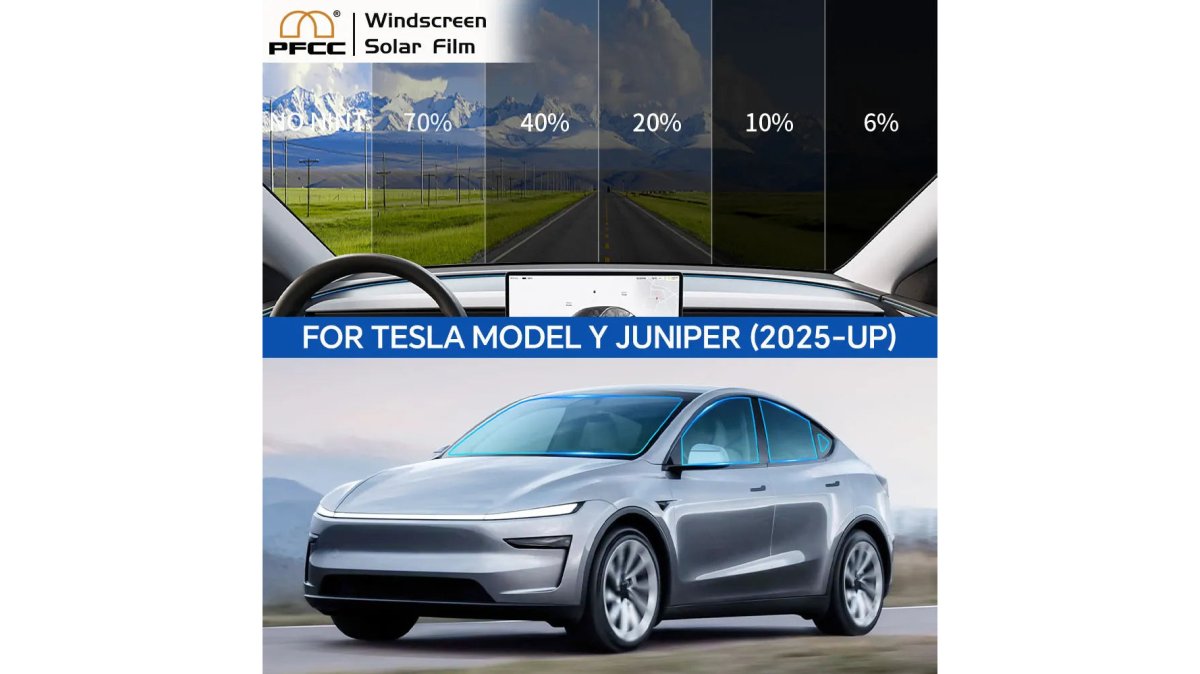
The Precut Window Privacy Tint Film for Tesla Model Y Juniper (2025-2026) ships precut and labeled per window for $183.99, so you get a clean result without booking a tint shop.
- Blocks up to 99% of UV rays, protecting your interior from fading
- Rejects infrared heat to keep the cabin cooler on hot days
- 2-ply PET construction adds anti-shatter protection
The 70% option blocks UV and heat without darkening the glass. Most installs run one to three hours with basic tools.
Aluminum Roof Rack Crossbar Set for Model Y
For Model Y roof cargo, verify the vehicle year, roof configuration, attachment points, and current product availability before ordering. Browse currently available Tesla accessories rather than relying on an unavailable roof-rack SKU.
Tesla Paint Protection Film Benefits for Cybertruck and Model Y
Tesla paint protection film is a clear or colored PET layer applied over factory panels to shield the finish from rock chips, UV fading, and road debris while optionally changing the vehicle's color. For Cybertruck owners, the Precut Color Change PPF for Tesla Cybertruck (2024-2026) at $659.99 delivers both: a new exterior color in Black or Glacier Blue plus protection for the stainless steel underneath.

- DIY precut film, repositionable during install thanks to PET construction
- Precision precut for Cybertruck body panels
- Removable without damaging factory paint or stainless steel
PET film is repositionable, letting you slide the panel into alignment before locking it down, and it is removable, so the change is reversible.
Tesla Exterior Accessory Installation Guide: What You Can DIY
Most Tesla exterior accessories are DIY-friendly with basic tools, patience, and a clean workspace. The table below maps each product to its difficulty, time, and tools.
| Product | Difficulty | Time | Key Tools |
|---|---|---|---|
| Side skirt body kit | Moderate | 1-2 hours | IPA, squeegee, hardware kit |
| Precut window tint | Moderate | 1-3 hours | Soapy water, squeegee, squeegee blade |
| Roof rack crossbars | Easy | 30-60 minutes | Torque wrench, service manual |
| Color change PPF | Advanced | 4-8 hours | Squeegee, slip solution, heat gun |
Two rules apply across all four: clean the surface with IPA or soapy water and let it dry fully, then test-fit before you commit. The roof rack is the easiest first project; hand color change PPF to a pro if you have never wrapped a panel.
Walkthrough: ABS side skirt extensions on a Model Y Juniper
This is the mod most owners start with: it changes the car's stance more than anything else at the price point and requires no lifting.
- Wash and degrease. Wash the rocker panels, then wipe the full mounting length with isopropyl alcohol on a clean microfiber and let it flash off. Any wax or road film left behind is where the adhesive fails first.
- Lay out the hardware. Match each extension to its side. Most kits are side-specific, and swapping them is the single most common first-timer mistake.
- Test-fit dry. Hold each extension against the rocker panel and check the gap line from front wheel to rear wheel for contact at both ends and a consistent gap along the middle.
- Mark alignment. Use painter's tape to mark the front and rear edges of each extension on the body, so the part does not drift when you set it down.
- Prep the adhesive. If the kit uses 3M VHB-style tape, peel only the first few inches of backing at each end. Leave the middle backed so you can still adjust.
- Set the front edge first. Press the leading edge against your tape mark, then work rearward, peeling backing as you go and pressing firmly with a roller.
- Bolt through factory points. Where the kit includes hardware, install it finger-tight first, confirm the panel is flush, then torque to the spec in the kit instructions. Do not overtighten into plastic.
- Final press and cure. Run a squeegee or roller along the full adhesive length. Avoid washing the car for at least 24 hours so the tape can cure.
Walkthrough: precut window tint film
Precut film removes the trimming step that slows tint shops, but not the need for a clean, wet install.
ABS Side Skirt Extension Body Kit for Tesla Model Y Juniper (2025) | Fast Aero →
- Clean the glass inside and out. Use a dedicated glass cleaner, then a squeegee to remove every streak. Interior glass holds more film than exterior glass.
- Mix your slip solution. A few drops of baby shampoo in a spray bottle of water is standard. Too much soap and the film slides forever; too little and it grabs before you can position it.
- Match each piece to its window. Precut kits are labeled per window. Lay them out in order before you start so you are not hunting for the right piece with wet hands.
- Wet the glass and the film. Spray both. The film should float and slide freely.
- Position and squeegee out. Set the film, align the edges, then squeegee from the center outward in overlapping strokes to push solution and trapped air to the edges.
- Handle curved glass with heat. Flat windows need no heat gun. Curved rear glass usually needs gentle heat to shrink the film into the curve. Keep the gun moving and never hold it in one spot.
- Check for lift at the edges. Run a microfiber-wrapped squeegee blade along each edge to press the film down. Any edge that lifts now will lift more once dry.
- Let it cure. Small water bubbles are normal and usually disappear over a few days as the film dries. Do not roll the windows down for at least 24 to 48 hours.
Walkthrough: roof rack crossbars
This is the easiest of the four and the best first project.
- Confirm your roof configuration. Crossbars that use factory attachment points require the vehicle to have the matching roof setup. Check before you order.
- Locate the mounting points. They are covered by small caps or flaps on the roof rails. Pop them off and set them aside.
- Set the crossbars in place. Most sets are front and rear specific. Check the kit instructions for which bar goes where.
- Start hardware by hand. Thread every fastener finger-tight before you torque anything, so the bars settle into alignment.
- Torque to spec. Use a torque wrench and the spec in your vehicle's service manual. Crossbars that are too loose rattle; too tight can stress the mounting points.
- Re-check after the first drive. Fasteners can settle. Re-check torque after your first trip with a load.
Warranty, Range, and Fitment: What Tesla Owners Should Know
Warranty, range, and fitment are the three questions buyers ask after the price, and the answers depend on how the mod attaches, what it changes, and what federal law says about aftermarket parts.
The federal rule that protects your aftermarket mods
The Magnuson-Moss Warranty Act (15 U.S.C. § 2301 et seq.) governs how a manufacturer can treat aftermarket parts. A manufacturer cannot void your warranty simply because a non-OEM part is installed, and can only deny coverage for a specific defect if it shows the aftermarket part caused it. In practice, a bolt-on side skirt does not void your drivetrain warranty, but a poorly wired aftermarket light that shorts a body control module could justify denying a claim tied to that module.
Keep your receipts and the product listing page for every mod. If a warranty dispute ever comes up, documentation that the part was designed for your exact model year is the first thing a service center will ask for.
Warranty-safe vs. warranty-risky mods
A useful way to sort exterior mods is by how reversible they are.
- Lowest risk (reversible, no factory modification): precut window tint film, precut color change PPF, and roof rack crossbars that use factory attachment points. These can be removed and the vehicle returned to stock, so there is nothing for a manufacturer to point to as a permanent alteration.
- Moderate risk (bolt-on, uses factory hardware): ABS side skirt extensions that bolt to existing rocker panel points. No drilling, no cutting, but the part is physically attached and could be argued to affect airflow or underbody clearance.
- Higher risk (requires cutting, drilling, or wiring): aftermarket spoilers that need new holes, diffusers that replace factory panels, and any lighting mod that taps into the factory harness. These are the mods where a service center has the most room to argue causation.
Owners often worry most about the mod they can see and least about the mod that touches a factory system. Lighting and wiring mods deserve the hardest thought.
How exterior mods actually affect range
Range impact comes down to one number: the drag coefficient (Cd). A Tesla Model Y sits around 0.23 Cd from the factory, and the Model 3 is in the same neighborhood.
- Side skirt extensions manage airflow along the rocker panel and can reduce turbulence under the car when they are fitted flush. A poorly fitted skirt with a gap at the leading edge does the opposite and adds drag.
- Rear spoilers and diffusers are the most misunderstood. A spoiler sized and angled for the vehicle's actual airflow can reduce lift and marginally improve high-speed stability. A large universal wing bolted to a car that was not designed for it adds frontal area and drag, which shows up as a range loss at highway speed.
- Roof rack crossbars are the clearest trade-off. Empty crossbars add a small but measurable drag penalty at highway speed; loaded crossbars with a cargo box add significantly more. If you are not using them, take them off.
The honest summary: cosmetic films and flush-fit skirts are range-neutral, crossbars cost a little when installed, and any large aero add-on not designed for your specific body shape is most likely to hurt efficiency.
Fitment is the deciding factor
A part engineered for your exact model year sits flush, seals against the body, and avoids the gaps that generate wind noise and drag; a universal part often leaves them. A 2025 Model Y Juniper and an earlier Model Y do not share every mounting point, so match the model year in the listing rather than ordering by model name alone.
A quick fitment checklist before you order
- Confirm the model year, not just the model name.
- Confirm the trim and roof configuration (roof rails vs. glass roof) where the part mounts to the roof.
- Confirm the part uses factory attachment points or adhesive only, with no drilling.
- Confirm the listing states the material and finish so you know what you are sealing against the body.
- Save the listing page and your receipt for warranty documentation.
Conclusion: Choosing the Right Tesla Exterior Mods
The hard part of buying custom Tesla exterior mods online is not finding parts, but finding parts that fit your exact model year and hold up over years of driving. Start with the mod that matches how you use the car: stance and aero for the daily driver, tint for cabin comfort, crossbars for cargo, and PPF for protection and a color change.
Frequently Asked Questions
Are exterior modifications legal on a Tesla?
Most Tesla exterior mods are legal, but window tint is the exception. Every state sets its own visible light transmission limits for front side windows, and some restrict windshield tint entirely. Body kits, roof racks, and paint protection film do not typically raise legal issues as long as they do not obstruct your view or lights. Check your state's tint rules before ordering a precut film kit, and keep your lighting and reflectors visible.
Do exterior mods affect Tesla warranty coverage?
A modification only affects warranty coverage if it causes the specific failure being claimed. A bolt-on side skirt kit or a set of aluminum crossbars will not void your whole warranty. The risk sits with parts that change electrical or suspension behavior. Keep your original parts and receipts, and if a service visit is coming, return the car to stock where practical. That protects you if a claim is questioned.
How do I ensure custom exterior parts fit my specific Tesla model?
Match the part to your exact model, model year, and trim before ordering. A 2025 Model Y Juniper has different body lines than an earlier Model Y, and a 2024-2025 Model 3 Highland console differs from the 2017-2020 layout. Compare your vehicle against the listing photos, check the stated fitment range, and contact the seller if the layout or connectors differ. Test-fit every panel before committing adhesive or hardware.
Are carbon fiber exterior mods worth the investment for a Tesla?
Carbon fiber costs more and saves weight, but on a daily-driven Tesla the difference is mostly visual. ABS plastic parts like the side skirt extension kit deliver the same stance change and UV resistance at a lower price, and they handle road debris without cracking. Choose carbon fiber when the weave pattern is the point. Choose ABS when you want the look and the aerodynamic benefit without the premium.
Can I install Tesla exterior mods myself?
Most bolt-on and adhesive exterior mods are DIY-friendly. The side skirt kit includes mounting hardware and an installation guide, and the precut tint film ships labeled per window with a wet-apply process that takes 1-3 hours. Roof rack crossbars mount at factory attachment points with no drilling. Clean the surface with IPA or soapy water first, test-fit everything, and work panel by panel. Only electrical work calls for a professional.
The real challenge is not choosing a mod, it is trusting that it will fit and last. Lee Mods takes that risk off the table with vehicle-specific fitment, quality materials, and straightforward support for every build. Browse our curated catalog, from ABS side skirt body kits to precut paint protection film, and get the parts engineered for your exact Tesla. Get started with Lee Mods and build your vehicle your way.